Sunday, October 18, 2009

Surround sound activation for Mplayer, Ubuntu

Mplayer has enough configuration arguments to initiate surround sound from stereo audio. One of my earlier posts was on how to activate the subwoofer channel. Now here is the full configuration


$ gmplayer -ao alsa -af surround=10,sub=75:5,center=4 -channels 5


Here
surround=10 : specifies the delay in surround channels (here it is 10)


center=4 : Which channel to redirect center channel audio derived from the front channels.


Mplayer will then derive the rest of the channels from the front channels and we have 5.1 music.

Friday, September 11, 2009

A Website for Under the hood info on cars

I stumbled upon a site on the internet while searching for detailed information on car suspension and wheel alignment. Very lucidly presented information on cars and its maintenance is available on this site.

Thursday, July 16, 2009

Activate subwoofer channel

Even if any music player like mplayer is used to activate the subwoofer channel, It won't get activated until 6 channel mode is activated in the volume control dialog.

To do this first double click the volume control icon on the top panel.

On the volume control dialog check if an "options" tab is available.

If not then click the "preferences" button and tick the "options" check box to activate it.

Now in the "options" tab change "Channel Mode" to 6 channel.

My sound driver & Mixer is ALSA for nVidia.

Saturday, June 27, 2009

Installing HP Printer in Ubuntu

There is an easy way to install a HP printer in any Linux installation including Ubuntu. Thanks
to HP for providing an installer that does all the job on its own.

My printer is an HP Deskjet D2360. First goto the site -

http://hplipopensource.com/hplip-web/install_wizard/index.html

Then select Distribution, Version, Printer type and Model

Proceed to download the installer and move it into a folder. ( A separate folder)

The downloaded file will be something like hp[version].run. Start a terminal window and
access this folder then run the installer by typing

$sh hp[version].run

If you don't put the installer in a separate folder the default directory will be flooded with
installation files.

The installer itself will recommend you to run the installation as default user. Provide the
administrator/root user password when you are asked to.

Select automatic installation(Recommended by default). Proceed to answer some simple
questions and the installer will automatically download and install any dependancies if
required.

Then it will ask you to replug the printer and the installation is done. You can print a test page
if needed.

The HP download page also contains detailed instructions to run the installer.

Friday, June 26, 2009

CUPS Server not running

To install a printer in ubuntu, the installer program demanded that the CUPS - Common Unix Printing System had to be be operational. But my system showed that CUPS was not active.

Then I verified System>Administration>Boot-up Manager and I couldn't restart CUPS

Typying cupsd at the terminal to evoke the daemon, I got the message -

"Child exited with status 1!"

A bit of googling told me to check /var/log/cups/error_log and it gave -

"/etc/cups/ssl/server.crt" is a bad symlink - No such file or directory

I found the solution later on as -

sudo apt-get install --reistall ssl-cert

It worked and CUPS was running again.

Saturday, May 30, 2009

Making subwoofer work for mp3 playback in Ubuntu

The only thing I felt missing whenever I played MP3s on Ubuntu was the rich punch of bass from my subwoofer speakers. There is no option of a mixer to reroute sub base frequencies to the subwoofer channel.

My Subwoofer is a home brewn one and has no external hardware to downmix and filter out the frequencies from the front stereo channels as found in 2.1 speaker systems. The ac3 filter or the ffdshow audio decoder I normally use in windows has this option but not in linux.

So I tried many media player applications in ubuntu. Amarok, Xine..etc...and ended up clueless

Then I installed mplayer from the repositories using

$ sudo apt-get install mplayer

MPlayer is a command line media player for KDE. The GUI version is GMplayer.

This one has got tons of command line options with it. The one I like particularly is the -af (Audio filter) option.

The man pages of mplayer are too large to scroll through, better make it into a file to be read by some thing like gedit.

it has the option sub=cutoff:channel

which it says will filter frequencies from the left and right channels using butterworth filter below the cutoff value and reroute it to the channel specified.

Here is what i have used

$ mplayer -ao oss -af sub=75:5 -channels 5

-ao : specifies the audio output driver, Here oss is given

-af : audio filter options without which the sub option won't work

sub=75:5 : the cutoff frequency and the sub channel

-channels : specifies the number of channels to be used.
Here mplayer recognises channel 5 as the sub channel.

if you want to invoke all these options when double clicking an MP3 file,

feed all these options with the "open with" menu's extra options. Add an "&" at

the end to make it work in the background.

Enjoy the thump of music!!!!

To configure the mixer for 6 channel mode in Ubuntu..see this post...

http://electrowonder.blogspot.com/2009/07/activate-subwoofer-channel.html


Sunday, May 10, 2009

Solve APIC problem in Linux

My AMD Athlon system used to freeze at boot time stating an APIC problem. We can temporarily skip the issue by adding noapic at the end of the boot command line.

But the problem keeps on nagging at each startup.

To solve the issue permanently edit the
GRUB bootloader configuration file - menu.lst

$ sudo gedit /boot/grub/menu.lst

Scroll down to find some text similar to the ones we see at the bootup options. Here is one

title Ubuntu 8.10, kernel 2.6.27-9-generic
uuid d727a8ef-4fbe-457d-987c-6959924f76b6
kernel /boot/vmlinuz-2.6.27-9-generic root=UUID=d727a8ef-4fbe-457d-987c-6959924f76b6 ro quiet splash vga=792
initrd /boot/initrd.img-2.6.27-9-generic
quiet


Like wise we'll see many options below this one. Now we have to just add the word 'noapic'
at the end of the line "kernel".

Save the file & restart the system.


Wednesday, April 1, 2009

Simple way to get rid of USB flash Drive Viruses & Worms

When it comes to the case of USB flash drives, some Anti-Virus softwares won't detect Worms or Viruses. U can get rid of them by a simple technique.

First ensure that the system you are using is virus free.  

Before inserting your flash drive to the USB port, press and hold down the "SHIFT" key on your keyboard. Release the key only after 5 seconds. This will prevent the system from executing an autorun operation. Virues inside the drive get activated on these autorun events. DO NOT open the drive now in any way.

Then switch to WINRAR.Winrar provides a file browsing facility and is found almost in every PC.  You can use any third party file browsing software. The viruses are made only to fool the Windows explorer. I have done this with ACDSEE's file browser too.

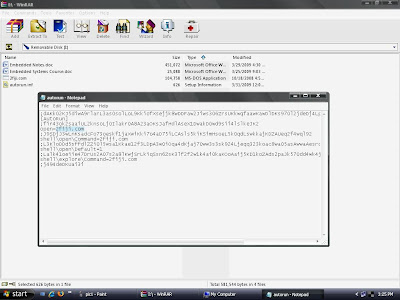
1) With Winrar, click the location dropdown bar to select the removable drive.


2) Here you can see the "autorun.inf" file which is primarily responsible for virus activation


3) Open the autorun.inf file by double-clicking it. It won't do any harm

The file says- Open 2fiji.com. There that's the one. Now we've to get rid of em. Close notepad

4) Press delete key on the keyboard after selecting the two files- The autorun.inf file and the other file mentioned in it 


Thats it . Done.  Now unplug the flash drive and insert it again. The drive is now ok and you can browse it using windows explorer. 

Note that the name of the virus file may not be always 2fiji.com. Also it may not appear on the drive directly. It may be hidden inside folders and their subfolders. Also the filenames may have an extension of ".exe". and its name and icon might resemble that of a folder.

Saturday, February 14, 2009

Watch Movies with a Laptop and TV - S-Video to Composite Converter

A couple of months earlier, my tutor Mr.Shafeek rang me and asked how he could connect his laptop onto his television so he could watch movies on his big screen. He had brought a locally available "S-Video to RC cable" for 300 Rs and the thing didn't work. I assured him that I would find a solution and report to him at the earliest.

At the same time I was hunting for a circuit to convert VGA signals to composite video so that I could see my desktop on my TV screen. So I Googled it and came up with a simple, low cost solution to do S-Video to CVS(Composite Video Signal). I discussed this with my friend Arun.K.V and he too expressed interest with this small project for he was also tired of watching movies on his laptop LCD display.

Teaming up with him we first went to our local electronics market- Thakarapparambu road - where there are plenty of shops selling electronic components. To our dismay, all the shops offered an S-Video to RCA cable which costs between 100 to 500 Rs depending on the quality. When inquired, a salesman asked "You want S-Video to 2 RC or 3 RC???". We were dumfounded for a TV had only one CVS- RCA socket and the rest two were intended for stereo audio channels.

So we purchased an S-Video plug, an RCA plug, wires and a 470 pf capacitor (pretty small circuit). Again this costs between 60-100 Rs depending on the quality. Putting together everything according to the circuit diagram, the assembled cable worked fine and we saw a very lively, bright display of the desktop on the 21-inch TV screen. Laptops with S-video ports also have configuration menus to adjust the display on the TV.

Presenting the cable to Mr. Shafeek sir, it is needless to say he was delighted. A DivX movie played on the TV screen resembled DVD like video quality.

The same site which I googled up also had the circuit I was looking for - a VGA to CVS converter. As convertion to CVS involves generation of timing signals the circuit is a bit complex, but can be built.

Here is the page for the S-Video to CVS conveter: http://www.epanorama.net/circuits/svideo2cvideo.html


Saturday, January 17, 2009

Chrome-A New Browsing Experience

Google recently released its own browser named "Chrome". This one application is so tailored that it became popular within no time. Being part of an open source project too, Chrome is still under development and only the Beta version is available for download.


This browser is so fast-it loads in seconds and is less memory hungry.  Chrome having excellent features like auto complete, predictive search, thumbnails of frequently visited web pages makes it the application for the regular net surfer.

If you haven't tried Chrome yet, give it a try- It weighs only about 8 MB


Features at a Glance
  • Very short loading time - Activates within seconds
  • Tabbed browsing facility for easier browsing
  • Requires less memory
  • Provides thumbnails of frequently visited pages at the welcome screen
  • Provides protection against malicious websites
  • Updates itself without user intervention
  • Its freeware - feel free to use


Expecting more from Google. Stay tuned.

Links for more information: